ServiceNow provides a variety of attributes that you can use to customize your information retrieval. In this section, you will use the ServiceNow Rest API Explorer with an example record to identify which fields and attributes are available.
You'll create a new sample incident from the ServiceNow Incidents module available in the sidebar navigation. Creating a new record in this manner will enable you to review all of the fields available, which you would not be able to access with a Self-Service view.
Provide the necessary details for the record. ServiceNow will generate an incident number and provide some preliminary details for the category, channel, state, impact, urgency, and priority. You can adjust these fields as needed while adding information for the caller, subcategory, business service, assignment group, assignee, configuration item, and description fields.
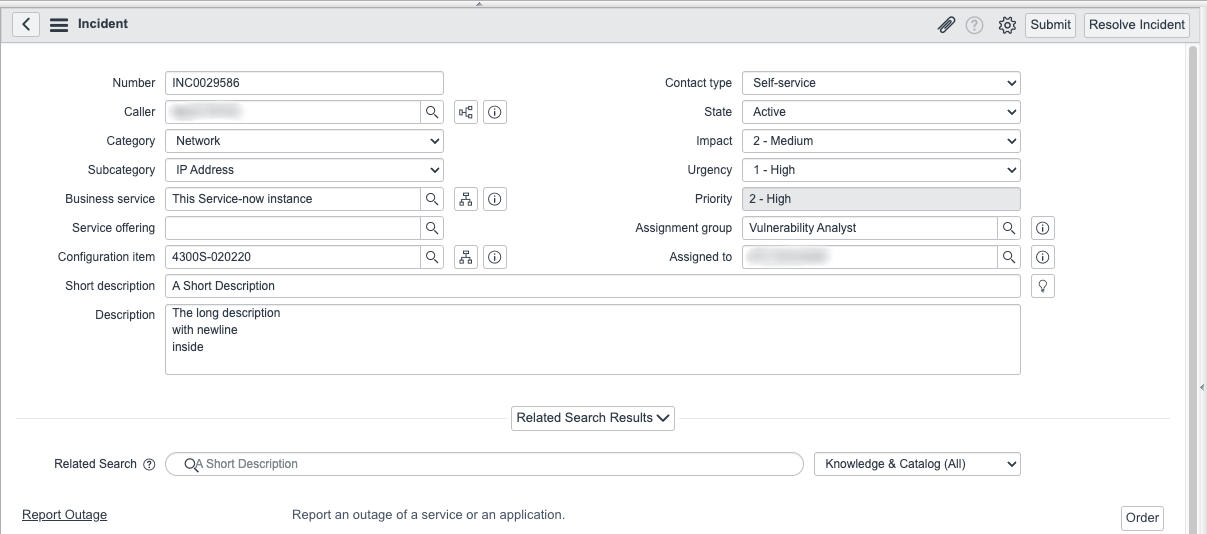
Be sure to keep track of the Number as you will need it momentarily. The example number is INC0029586.
Press Submit to create the new Incident, then search for Rest API Explorer in the navigation sidebar.
In the REST API Explorer, you will need to set additional parameters. Select the following options from the available dropdown menus in the left panel:
-
Namespace — now
-
API Name — Table API
Then click Retrieve records from a table (GET) to specify the type of API call to make. This option typically loads by default.
The panel on the right will load a GET request for the Table API in which you can prepare the request. Select Incident (incident) for the tableName parameter.
You'll also supply your incident number in the sysparm_query field with the following format: number=INC#######, where the numbers match your incident. The example Incident would be formatted number=INC0029586 in the sysparm_query field. Click Add query parameter to set the supplied parameters.
Make sure that the Request format and Response format are both set to application/json. These options ensure that you can send and receive data in a JSON format. Press Add header to set the request header.
When you have finished setting the query parameters, press Send. You'll receive an output similar to the following in the Response Body:
{ "result": [ { "parent": "", "made_sla": "true", "caused_by": "", "watch_list": "", "upon_reject": "cancel", "sys_updated_on": "2023-07-28 18:58:09", "child_incidents": "0", "task_effective_number": "INC0029586", "approval_history": "", "skills": "", "number": "INC0029586", "resolved_by": "", "sys_updated_by": "admin", "opened_by": { "link": "https://your_instance.service-now.com/api/now/table/sys_user/6816f79cc0a8016401c5a33be04be441", "value": "6816f79cc0a8016401c5a33be04be441" }, "user_input": "", "sys_created_on": "2023-07-28 18:58:09", "sys_domain": { "link": "https://your_instance.service-now.com/api/now/table/sys_user_group/global", "value": "global" }, "state": "2", "route_reason": "", "sys_created_by": "admin", "knowledge": "false", "order": "", "calendar_stc": "", "closed_at": "", "cmdb_ci": { "link": "https://your_instance.service-now.com/api/now/table/cmdb_ci/46b87032a9fe198101b2df13015be972", "value": "46b87032a9fe198101b2df13015be972" }, "delivery_plan": "", "impact": "2", "active": "true", "work_notes_list": "", "business_service": { "link": "https://your_instance.service-now.com/api/now/table/cmdb_ci_service/d4e69e230a0a3c152e3a0cd4c1ef2107", "value": "d4e69e230a0a3c152e3a0cd4c1ef2107" }, "vulnerability": "", "priority": "2", "sys_domain_path": "/", "rfc": "", "time_worked": "", "expected_start": "", "opened_at": "2023-07-28 18:51:38", "business_duration": "", "group_list": "", "work_end": "", "caller_id": { "link": "https://your_instance.service-now.com/api/now/table/sys_user/d6826bf03710200044e0bfc8bcbe5da7", "value": "d6826bf03710200044e0bfc8bcbe5da7" }, "reopened_time": "", "resolved_at": "", "approval_set": "", "subcategory": "ip address", "work_notes": "", "universal_request": "", "short_description": "A Short Description", "close_code": "", "correlation_display": "", "delivery_task": "", "work_start": "", "assignment_group": { "link": "https://your_instance.service-now.com/api/now/table/sys_user_group/28e5fabfb78b001004aae3fdde11a919", "value": "28e5fabfb78b001004aae3fdde11a919" }, "additional_assignee_list": "", "business_stc": "", "description": "The long description\r\nwith newline\r\ninside\r\n", "calendar_duration": "", "close_notes": "", "notify": "1", "service_offering": "", "sys_class_name": "incident", "closed_by": "", "follow_up": "", "parent_incident": "", "sys_id": "d2201c581b189d10ffadeb95604bcb42", "contact_type": "self-service", "reopened_by": "", "incident_state": "2", "urgency": "1", "problem_id": "", "company": { "link": "https://your_instance.service-now.com/api/now/table/core_company/31bea3d53790200044e0bfc8bcbe5dec", "value": "31bea3d53790200044e0bfc8bcbe5dec" }, "reassignment_count": "0", "activity_due": "", "assigned_to": { "link": "https://your_instance.service-now.com/api/now/table/sys_user/8d56406a0a0a0a6b004070b354aada28", "value": "8d56406a0a0a0a6b004070b354aada28" }, "severity": "3", "comments": "", "approval": "not requested", "sla_due": "", "comments_and_work_notes": "", "due_date": "", "sys_mod_count": "0", "reopen_count": "0", "sys_tags": "", "escalation": "0", "upon_approval": "proceed", "correlation_id": "", "location": "", "category": "network" } ] }
When evaluating this JSON response, you can identify that the form's fields and values correlate to specific API fields and values. The following table identifies the correlations for the example provided:
|
Form field |
Form value |
API field |
API value |
|
Number |
INC0029586 |
number |
INC0029586 |
|
Caller |
Redacted Name 1 |
caller_id |
d6826bf03710200044e0bfc8bcbe5da7 |
|
Category |
Network |
category |
network |
|
Subcategory |
IP Address |
subcategory |
ip address |
|
Business Service |
This Service-now instance |
business_service |
d4e69e230a0a3c152e3a0cd4c1ef2107 |
|
Configuration item |
4300S-020220 |
cmdb_ci |
46b87032a9fe198101b2df13015be972 |
|
Short description |
A Short Description |
short_description |
A Short Description |
|
Description |
The long description with newline inside |
description |
The long description\r\nwith newline\r\ninside\r\n |
|
Contact type |
Self-service |
contact_type |
self-service |
|
State |
Active |
state |
2 |
|
Impact |
2 - Medium |
impact |
2 |
|
Urgency |
1 - High |
urgency |
1 |
|
Priority |
2 - High |
priority |
2 |
|
Assignment group |
Vulnerability Analyst |
assignment_group |
28e5fabfb78b001004aae3fdde11a919 |
|
Assigned to |
Redacted Name 2 |
assigned_to |
8d56406a0a0a0a6b004070b354aada28 |
Now that you know which fields correlate with the necessary API attributes, you can test API calls. For this guide, you'll test adding a record through the API.
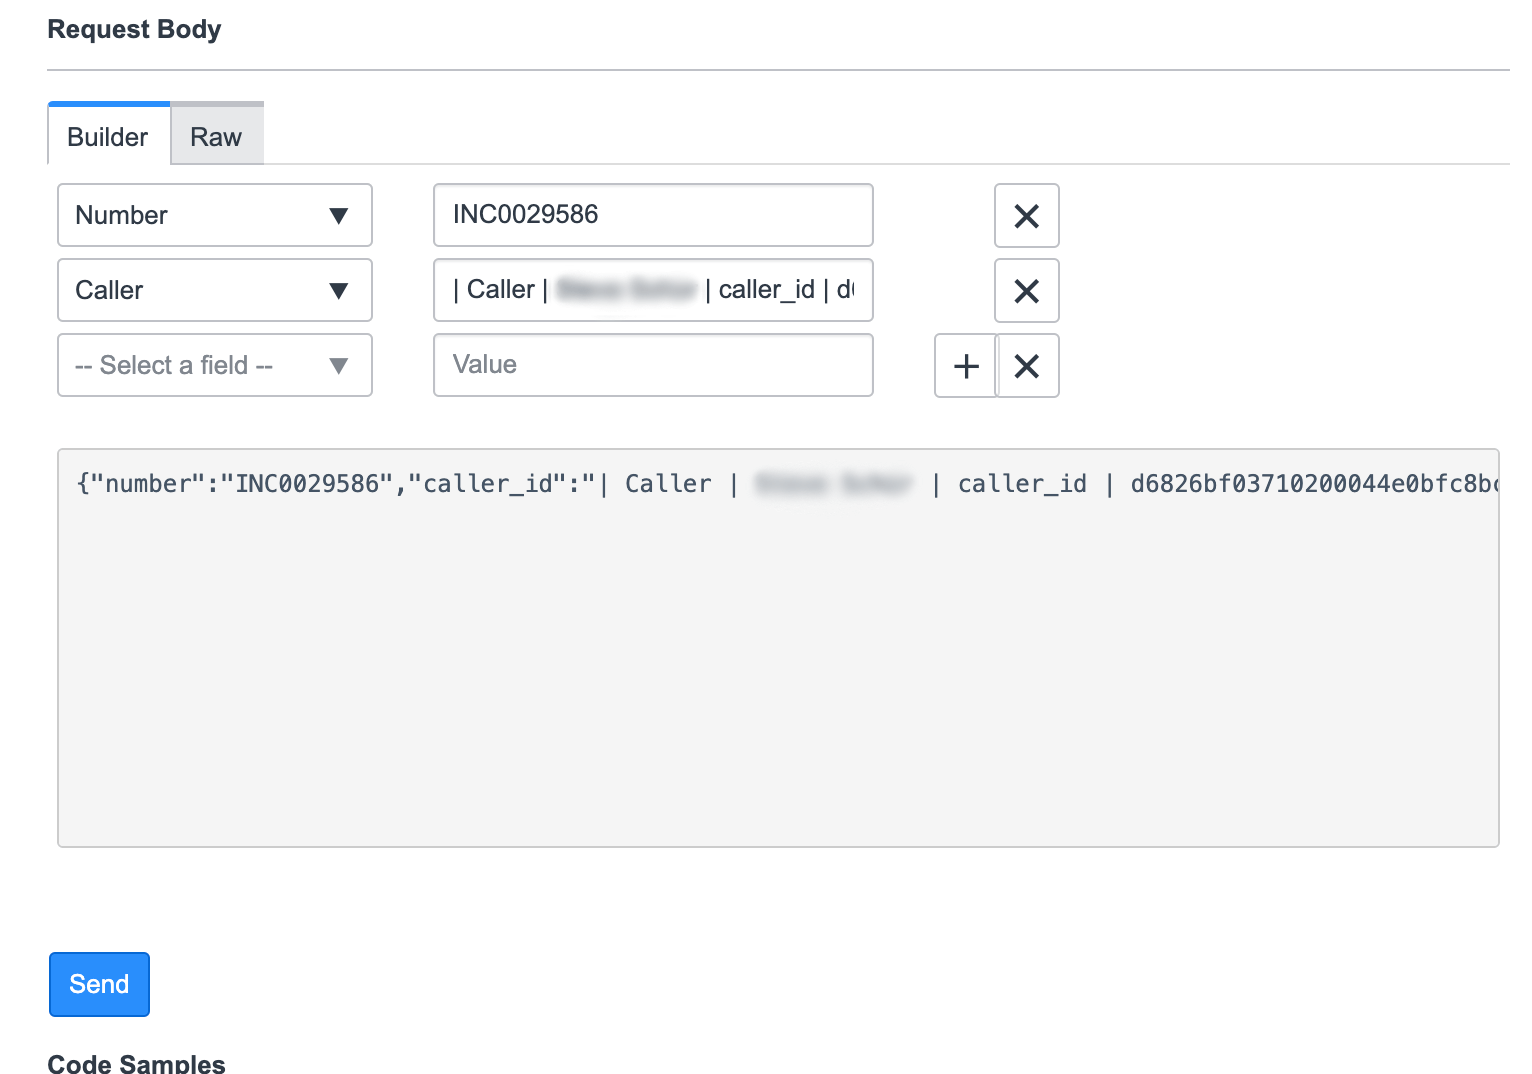
In the Rest API Explorer left panel, select Create a record (POST) and choose the Incident (incident) table. For the Request Body section, use the Add a field button to select the fields you want to add. Supply the values for those fields, then click Send.
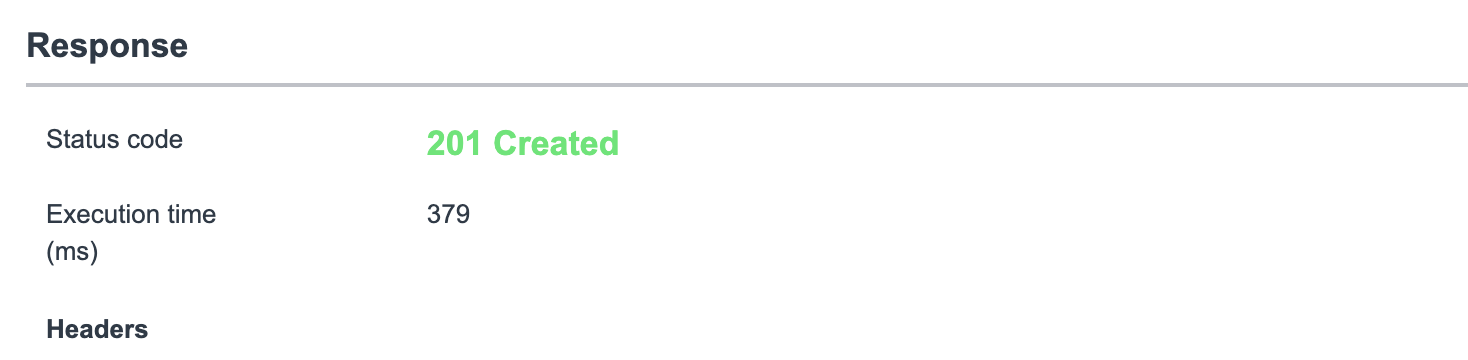
You will receive a browser prompt for Modifying data, confirm to continue. Approve the prompt, after which you will be able to view the record that was created. A 201 Created message indicates that the record was created, and you can review the headers and response body to confirm if the values created match those you supplied.
If the values align, copy the Request Body JSON to supply in UpGuard's payload template. For the example above, you would copy the following JSON payload:
{ "caller_id":"d6826bf03710200044e0bfc8bcbe5da7", "category":"network", "subcategory":"ip address", "business_service":"d4e69e230a0a3c152e3a0cd4c1ef2107", "cmdb_ci":"46b87032a9fe198101b2df13015be972", "short_description":"#", "description":"The long description\\r\\nwith newline\\r\\ninside\\r\\n", "contact_type":"self-service", "state":"2", "impact":"2", "urgency":"1", "priority":"2", "assignment_group":"28e5fabfb78b001004aae3fdde11a919", "assigned_to":"8d56406a0a0a0a6b004070b354aada28" }
In the sample provided, each attribute was added on a new line and the short_description was replaced with a variable.
To connect this record with your UpGuard integration, you would follow the same process as Step 2 and supply the response body as the payload template.
Sending events to Security Incident records
The Security Incident table in ServiceNow (sn_si_incident) is an extension of typical Incident records. Security Incidents are often used by cybersecurity teams to provide additional details beyond the standard Incident type.
The process for Security Incidents is similar to Incidents. Follow the same process as Steps 2-3, but substitute sn_si_incident in place of incident in the webhook URL when you create the integration in UpGuard: https://your_instance.service-now.com/api/now/table/sn_si_incident.
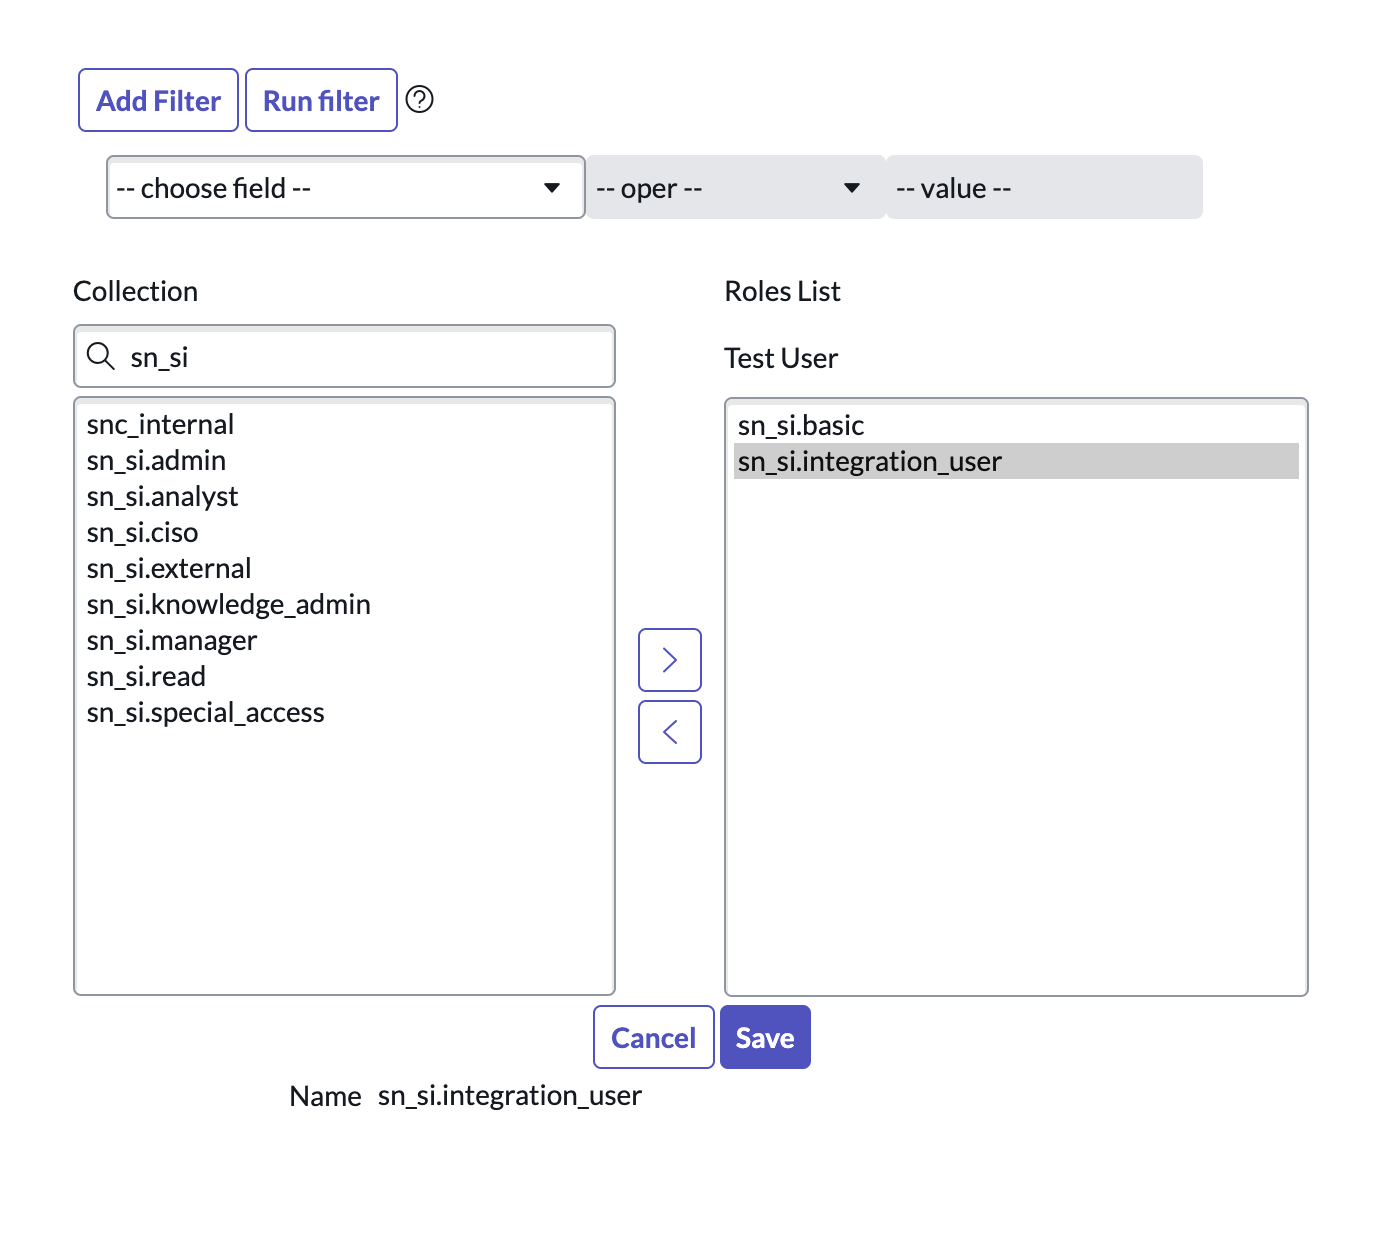
You will also need to grant additional permissions to the API user in ServiceNow. Open the details for your ServiceNow API user. Navigate to the Roles section for your user and click Edit. Search for sn_si, then add the roles for sn_si.basic and sn_si.integration_user. You can add roles, but do not remove any. Leave existing roles that have been derived from ServiceNow upgrades and other permissions.
Save the user permissions when finished. Your ServiceNow API user will now be capable of retrieving details necessary for Security Incidents via your configured UpGuard webhook trigger.
You may want to use this additional feature to keep C-suite leadership informed about high-level security incidents across your ITSM toolchain.
See also: