
- Overview
- Add a vendor (with a web presence)
- Add a vendor (without a web presence)
- Start monitoring a vendor you aren’t monitoring
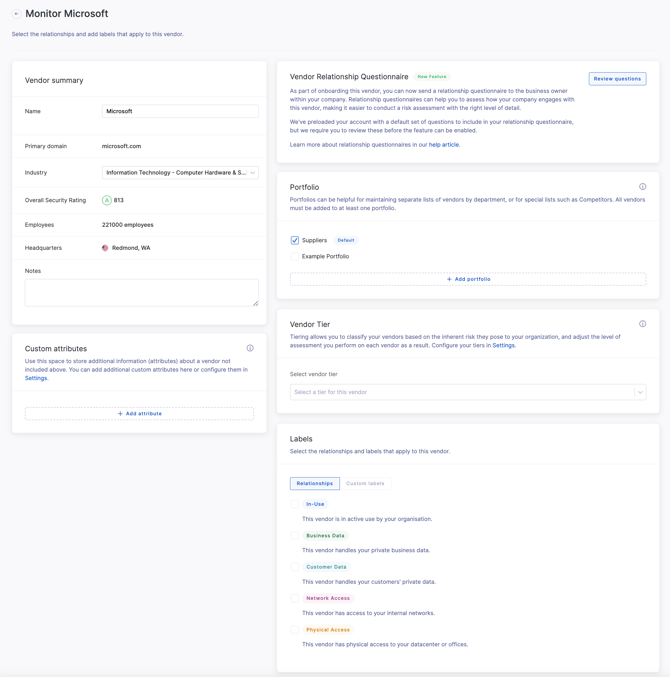
- Add vendor attributes
Overview
UpGuard's Vendor Risk is a self-service platform where you can automate your third party risk assessment workflows, receive instant notifications about your vendors' security, and streamline the vendor lifecycle management in a centralized dashboard.
With Vendor Risk, you can monitor vendors that you have a relationship with, access information about your monitored vendors, manage vendor assessments, and set up notifications to alert you if a vendor's status changes. You can also send questionnaires to vendors to help you communicate and resolve potential risks.
On paid plans, you can also add vendors without monitoring them, to keep a record of vendors you don't need to continuously monitor. See Vendor Risk: Not Monitored Vendors.
Add a new vendor (with a web presence)
- Click the Vendor Risk icon in UpGuard’s left-hand navigation panel.
- Click Add vendor.
- Click in the search bar and begin typing a vendor’s URL or name (if this is your first time adding a vendor, you might see a list of recommendations based on detected vendors).
- Check the box next to the vendor (or vendors) you want to add — confirm the URL matches the URL of the vendor you’re intending to add.
- Repeat steps 3-4 until you’ve selected all of the vendors you want to add.
- Click Next.
-
Choose whether to monitor each vendor. Monitoring is enabled by default — disable the Monitor [vendor name] toggle to add a vendor to your Not monitored tab.
-
(if you’re adding one vendor only) Select how to add the vendor's details
- Send an onboarding request — ask a colleague who knows the vendor to fill in its details. This option needs the vendor to be monitored and onboarding requests to be turned on for your organization.
- Enter details manually — set the tier, lifecycle stage, and other details yourself.
- Click Next.
The vendor is added to your Vendors page — on the Monitored tab if you're monitoring it, or the Not monitored tab if you're not. If you chose Enter details manually, the Edit [vendor name] page opens: add the vendor's details and click Save. We strongly recommend:
🎵 If you search (step 3) but your vendor doesn’t appear: type the vendor's url and click Attempt to scan. When UpGuard finds the vendor, resume at step 4 or add the vendor without a web presence.
🎵 Monitoring a vendor you haven't monitored in the last 12 months uses a change. See Vendor Risk: Monitoring Slots and Change Limit.
Add a new vendor (without a web presence)
Sometimes you work with vendors without a web presence, you can add those vendors to UpGuard as well.
- Click the Vendor Risk icon in UpGuard’s left-hand navigation panel.
- Click Add vendor.
- Click in the search bar and begin typing a vendor’s name.
- Click Create a vendor at the bottom of the modal.
- Enter the vendor’s name.
- Select the vendor’s primary industry from the dropdown.
- Click Create new vendor.
You’re now monitoring the new vendor! However, the vendor needs to return a questionnaire to receive a security rating, which will then activate the risk remediation workflow for your vendor relationship. We strongly recommend adding vendor attributes for each vendor you’ve added.
🎵 Vendors you add this way are always monitored. To add a vendor with no web presence without monitoring it, import it from a CSV with no-domain as its domain and No in the Monitored column.
Start monitoring a vendor you aren’t monitoring
Start monitoring a not-monitored vendor to get its security rating, questionnaires, risk assessments, and remediation. Its tier, labels, portfolios, and other details stay as they are.
1. Navigate to Vendor Risk > Vendors.
2. Click the Not monitored tab.
3. Click the three dots at the end of the vendor's row.
4. Click Start monitoring.
5. Click Turn monitoring on to confirm.
The vendor moves to the Monitored tab and uses one of your monitoring slots, so you need a free slot to start monitoring it. You can also click Monitor vendor on the vendor's Vendor Summary page, or select several vendors and click Start monitoring.
❗ If you've reached your change limit, you can only start monitoring vendors you've monitored in the last 12 months.
Vendor attributes
Add vendor attributes (listed in the table below) from the edit vendor page. You’ll automatically land on this page when you add a single new vendor and choose Enter details manually, but to edit a vendor's attributes any other time:
- Click the Vendor Risk icon in UpGuard’s left-hand navigation panel.
- Search for and select the appropriate vendor (from the Vendors tab).
- Click the three dots in the upper-right corner.
- Click Edit details.
You can also click the three dots at the end of a vendor's row on the Vendors page and click Edit details.
| Attribute | Recommendation | What it does | Why to add it |
| Tier | Always recommend | Classify the level of risk this vendor poses to you. | - Create tier-based assessment SLAs and risk assessment schedules. - Flag critical risks that could affect business continuity. - To enable you to react to the most important risks first by prioritizing Tier 1 risks. |
| Label | Always recommend | Tags that identify the data and access level a vendor has to your company. Pre-built and custom labels are available. |
- See the data and access level a vendor has to your company. - List a vendor’s compliance requirement or to list a specific data-type being accessed. - Report on vendors matching specific labels. Custom label examples: HIPPA, banking information. |
| Portfolio | Strongly recommend |
Identifies the internal business unit that owns a vendor. Vendors must belong to at least one portfolio. |
- Report on vendors by portfolio. - Manage or assign internal workflows. - Identify regional and foreign vendors. |
| Lifecycle stage | Strongly recommend |
Records where the vendor is in its relationship with you: Procurement, Onboarding, In use, Offboarding, or Archived. |
- Track each vendor from procurement through to offboarding. - Keep a record of archived vendors without monitoring them. |
| Custom attributes | Situational | Custom fields you can create and associate with vendors. | - Track data not accounted for via standard fields (portfolio, labels, tiers, etc). - Use integrations to map fields from other softwares into UpGuard custom attribute fields. Custom attribute examples: contract end date, internal owner. |
| Industry | Situational | Pre-populated field categorizing vendors by their industry. Update if necessary. |
- Update to a more nuanced industry - Better align with internal industry definitions. |
| Notes | Situational | A free-text field for capturing insightful but auxiliary data. | Notes examples: Net payment terms, past security incidents. |
See also: