
- Overview
- Sources and matching
- What's in an app store threat
- Review and action app store threats
- Limitations
- Best practices
Overview
App Store Detection finds mobile apps published on the Apple App Store and Google Play that reference one of your Transforms. Learn more about Transforms.
This gives you visibility into how your brand, name, and assets are being used inside publicly distributed mobile apps. App stores are a high-trust distribution channel, which makes them an efficient place to run brand abuse at scale and a blind spot for web-based detection.
How it works:
- UpGuard scans the app stores. UpGuard discovers app listings on the Apple App Store and Google Play.
- Matching listings become signals. UpGuard looks for references to your Transform in the app metadata.
- The Threat Analyst triages. The Analyst identifies apps that appear to be your organization's own and dismisses them. For each remaining app it infers the risk, assigns a threat type, and sets severity to match.
- You review the threats. App store threats appear in the Open Web queue, where you work them through the standard threat workflow.
Sources and matching
UpGuard scans two commercial app stores:
- Apple App Store
- Google Play Store
Within each listing, UpGuard matches your Transform against:
- App name
- Developer name
- App description
- Metadata and listing content
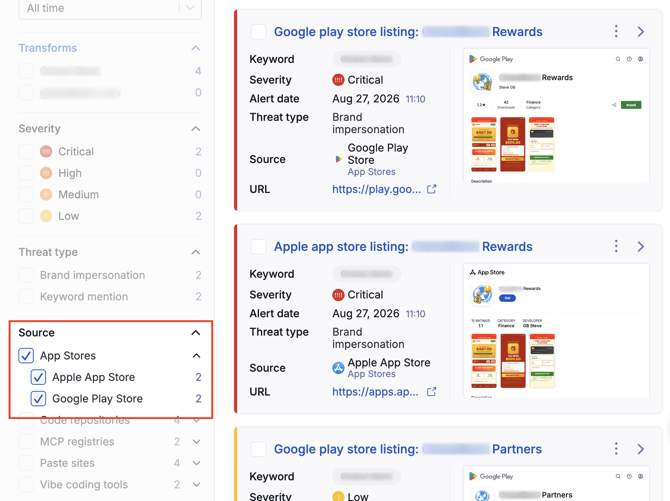
Both stores sit under the App Stores source group in the Open Web queue. You can filter to one store or to both.
What's in an app store threat
An app store threat carries the standard Threat Monitoring fields plus metadata pulled from the store listing. Both sets appear under Details & Metadata.
| Field name | What is shows |
| Keyword | The Transform that matched. |
| Severity | The severity the Threat Analyst assigned. |
| Detection date | When Breach Risk discovered the threat. |
| Alert date | When the threat was published to your feed. |
| Threat type |
Either:
|
| Source | Where the threat was detected, i.e. Apple App Store or Google Play Store. |
| URL | A link to the live store listing. |
| Investigator | The team member assigned to the threat, if any. |
| App name | The app title as published. |
| Product ID | The app's bundle ID or package name, e.g. com.example.rewards. |
| Developer | The publisher name shown on the listing. |
| Rating | The store rating. Apple App Store also shows the number of reviews. |
| Downloads | The reported install count. Google Play only. |
| Category | The store category the app is published under. |
| Release Date | The listing's release date. |
Two more sections sit on the threat:
- Threat summary. The Threat Analyst's assessment, split into Threat context, Indicators of risk, and Remediation guidance.
- Preview. A rendered version of the store listing — app icon, developer name, rating, category, screenshots, and the listing description. The preview is generated from public listing data for illustration, so open the URL when you need the live listing.
Three tabs run across the top of the threat: Details, Comments, and Timeline. Use Comments to record what you found for the rest of the team, and Timeline to track what has happened to the threat; these can be useful when a takedown request span multiple weeks.
❗ Listings change and get pulled. Capture your own evidence from the live listing before filing a takedown report.
Review and action app store threats
- Click the Breach Risk icon from UpGuard's left-hand navigation.
- Click Threat Monitoring from the left navigation.
- Click Open Web.
- Under Source, select App Stores — or select Apple App Store or Google Play Store to filter to one store.
- Click a threat to open it.
- Read Threat summary for the Analyst's assessment, then check Details & Metadata and Preview against your organization's genuine apps.
- Click Manage threat and choose an action.
- Under Collaborate:
- Add comment — record what you found for the rest of the team.
- Assign investigator — hand the threat to a team member.
- Request remediation — start a remediation request.
- Or, under Resolve:
- Remediated — the listing has been removed.
- No action needed — you’ve decided not to act on the listing.
- False match — the app is one of yours, or the match is wrong.
- Under Collaborate:
✨ Click Configure rule from the Manage threat menu to create a Threat Monitoring rule — useful for regional or white-label versions of your own apps that will keep matching.
Limitations
App store detections don't create inventory assets. A detected app is a threat only — it isn't added to your inventory.
A detection means an app's public listing references your Transform. However, it doesnot confirm who built the app, who controls it, or whether it is affiliated with your organization. Check every detection against your own list of genuine apps.
❗ Getting a listing removed doesn't stop the same actor re-publishing under a new Product ID.
Best practices
- Keep a list of your genuine apps: Record the app name, developer name, and Product ID for every app your organization publishes. This will be especially useful if you need to file a takedown report.
- Check the Preview, then check the live listing: The Preview is enough to recognize an obvious impersonation. Anything you intend to report needs evidence captured from the live listing.
- Don't track actors by Product ID alone: A suspended Google Play package name can't be reused, so a re-upload under that name will look new. Watch the developer name, icon, and brand strings as well.
- Rule out your own listings once: Regional and white-label versions of your own apps will keep matching. Create a rule rather than dismissing them one at a time.
- Report the pattern, not just the app: Where you find several listings from one publisher, note them together. Both stores treat repeat and related violations more severely than a single listing.