- Threat workflow queues
- How to read a threat
- Workflow actions
- Filter threats
- Move a threat to a different queue
- Comment on a threat
- Dismiss a threat
- Bulk edit threats
- Export threats
Threat workflow queues
UpGuard’s Threat Monitoring workflow has four queues: Open, Investigating, Remediating, and Closed. Threats detected by Threat Monitoring are put into one of two queues: Open or Closed.
| Queue | Description | How threats land here |
| Open | Threats that require attention. Threats automatically land here if the AI Threat Analyst has identified the threat and has determined that it warrants your review. | Automatic scans |
| Investigating |
Open threats that are currently being investigated. Move threats to Investigating when the nature of the event is unclear or when its threat level needs verified. |
Manually (e.g. moved from Open to Investigating) |
| Remediating |
Open threats that are currently being remediated. Move threats to Remediating if remediation is complex, time-consuming or requires action from another person. |
Manually (e.g. moved from Investigating to Remediating) |
| Closed | Identified threats that were either: automatically closed by the AI Threat Analyst, manually moved to Closed after going through the remediation workflow, or manually closed for another reason. Threats in closed are assigned a status providing more detail. |
Automatically (closed by AI) Manually (e.g. from Remediating to Closed) |
How to read a threat
- Click the Breach Risk icon from UpGuard’s left-hand navigation.
- Click Threat Monitoring from the left navigation.
- Click a threat.
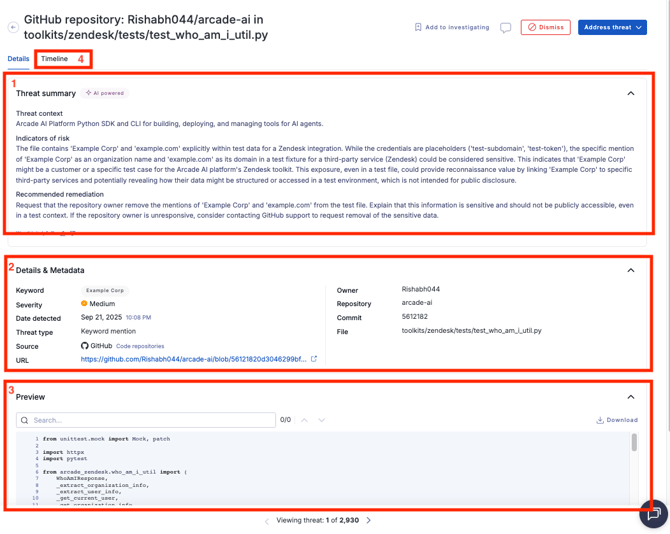
- Threat summary: what the threat is, why it’s been identified as a threat, and what the recommended remediation strategy is.
- Details & Metadata: threat details (associated Transform, severity, date detected, threat type, source, etc).
- Preview: Lists particular snapshots of where the threat signal was detected. Mentions of the detected keyword are highlighted by default but you can search for other values as needed. Preview is not available for Stealer logs, in this case information is in the metadata.
- Timeline: A timeline with actions related to the threat (when the threat was detected, when it was changed into a workflow queue, etc).
Workflow actions
Threat Monitoring includes several workflow actions designed to help you manage findings efficiently and accurately.
- What are actions? Each action reflects a different stage or outcome in the investigation and remediation process.
- Why use actions? To keep your threat queue organized and ensure your team’s responses are tracked and measurable
- How to use actions? Use actions consistently to improve the fidelity of your Threat Monitoring data and to help both your analysts and the AI Analyst maintain clarity and confidence in ongoing detections.
| Action | When to use | Examples |
| False positive |
- A signal has been incorrectly captured (it doesn’t actually belong to your organization). - There is clearly no attributable risk. |
- A mention of your organization in an identifiably harmless or informational context. Ex: a blog post citation, press coverage, or academic reference. - Automated or test data (for example, bot chatter, placeholder text, or code samples) that happen to contain your organization’s name or domain but are not related to a real asset. - A signal incorrectly attributed to your Transform that clearly belongs to a different organization or unrelated entity. |
| Risk accepted |
- The finding is a legitimate but low-level risk that doesn’t require further action. - The threat is correctly attributed to your organization, and you’ve decided not to take remediation action. |
- A mention of your organization in a questionable context (you cannot immediately rule it out as harmless). Ex: Low-level dark web chatter mentioning your organization or executives without any sensitive data or actionable content. - A GitHub repository referencing your brand name or internal project in a benign context, with no exposed secrets or credentials. - An old or already-known exposure (for example, a past data leak that has been addressed) that reappears in a new post or aggregator feed. |
| Assign Investigator |
- The threat appears legitimate but requires further review. - The signal is unclear, requires analysis, or specialist expertise. |
- Ambiguous mentions of your brand or assets on the dark web. - A GitHub repository where it’s not immediately clear whether the exposure represents a real risk. |
| Request Remediation |
- Legitimate threats that require complex or time-consuming remediation steps. - This option triggers a remediation request workflow to track and manage resolution efforts. |
- An employee stealer log containing company credentials, requiring credential cycling and malware removal. - A GitHub repository exposing internal dependencies. - Evidence of data or network access for sale on dark web marketplaces. |
| Remediated | Threats verified as legitimate and the necessary remediation action has been completed. |
- A customer or employee credential is detected in a stealer log where the password has been reset or invalidated right away. - A public GitHub repository containing an exposed token or key that has now been revoked and replaced. - A document on a sharing platform (like Pastebin or Scribd) containing sensitive text that has been removed or access-restricted. - A phishing or impersonation site was detected through a Transform that has been successfully reported and taken offline via a takedown process. |
Filter threats
Use filters to hone in on the threats you want to work with.
- Click the Breach Risk icon from UpGuard’s left-hand navigation.
- Click Threat Monitoring from the left navigation.
- Use the Filters panel to apply the desired filters.
You can filter by:
- Date closed (using pre-set date ranges)
- Transforms
- Severity
- Threat type
- Source
- Text (contains or does not contain)
- Closed by
- Status
Move a threat to a different queue
For threats in Open, Investigating, or Closed:
- Click the Breach Risk icon from UpGuard’s left-hand navigation.
- Click Threat Monitoring from the left navigation.
- Click a threat.
- Move the threat to the appropriate queue using the buttons in the threat’s upper-right corner. The options available depend on which queue the threat is currently in.
| Threat's current queue | Move the threat to |
| Open |
|
| Investigating |
|
| Closed |
|
For threats in Remediating:
Mark the remediation request as completed via the remediation workflow in Breach Risk. When the remediation request is marked as Remediated or Waived the threat is automatically moved to Closed in Threat Monitoring.
Comment on a threat
Add comments to threats in Open, Investigating, or Closed threats to communicate with internal stakeholders or leave reference notes. Commenting on an Open threat automatically moves it to Investigating.
- Click the Breach Risk icon from UpGuard’s left-hand navigation.
- Click Threat Monitoring from the left navigation.
- Click a threat.
- Click the Comments tab.
- Type your comment
- Click Add comment.
Your comment is now added to the threat and visible to anyone with access to view the threat.
Dismiss a threat
Dismiss a threat when:
- it’s a false positive: this threat is not actually related to your Transform.
- the ‘threat’ is related to the Transform, but it is not something that needs to be investigated.
How to dismiss a threat
- Click the Breach Risk icon from UpGuard’s left-hand navigation.
- Click Threat Monitoring from the left navigation.
- Click the threat you want to dismiss.
- Click Manage threat in the threat’s top-right.
- Select False positive or Risk accepted. If you select Risk accepted, you’ll be prompted to enter additional information and then click Close as risk accepted.
Your threat is moved to Closed and assigned the status False positive or Risk accepted respectively.
Bulk edit threats
Bulk select threats to:
- move all selected threats to Investigating
- mark all selected threats as remediated (threats are moved to Closed)
- mark threats as False positives (threats are moved to Closed)
- mark threats as Risk accepted (threats are moved to Closed)
Bulk select threats in Open or Investigating
- Click the checkbox next to each threat you want to select.
- Click the checkbox above the threat list to mass select all visible threats.
Apply filters and then mass select all visible threats. By default, only visible threats will be selected. If there are multiple pages of threats, you’ll see an option to Select all ‘#’ threats.
Export threats
Export threats in Open, Investigating, Remediating, or Closed. Threats are exposed as .xlsx files.
- Click the Breach Risk icon from UpGuard’s left-hand navigation.
- Click Threat Monitoring from the left navigation.
- Select the queue corresponding with the threats you want to export: Open, Investigating, Remediating, or Closed. Each queue must be exported individually, you cannot export threats from multiple tabs at time.
- Modify export settings:
- Filters: export the tab’s full list or a filtered list.
- Frequency: one-time or recurring (weekly, monthly, quarterly, yearly).
- Delivery: reports or email and reports.
- Click Export.
Your report begins exporting immediately and will be delivered to you in Reports>Generated reports (and via email depending on your selections).