
- Overview
- Step 1: Create an Entra application registration
- Step 2: Assign permissions
- Step 3: Generate an application secret
- Step 4: Gather the Application and Tenant ID
- Step 5: Enter the values into User Risk
Overview
To get started with User Risk, you'll need to grant secure, read-only access to your user and SaaS usage data. We do this using the standard Microsoft Graph API, which requires creating a specific Entra application for User Risk.
Completing this step is essential because it allows you to connect your directory and start populating your User Risk dashboard with your own data.
In this article, we’ll walk you through how to gather the three values you’ll need to integrate your Entra directory with User Risk:
- Client secret value
- Application (client) ID
- Directory (tenant) ID
Step 1: Create an Entra application registration for User Risk
- Open your Entra administration screen (https://entra.microsoft.com).
- Select App registrations.
- Click + New registration.
- Give the application registration a name and click Register.
To learn more, see Register an application in Microsoft Entra ID.
Step 2: Assign permissions
From the newly created application,
- Click API Permissions.
- Click + Add a permission.
- Click Microsoft Graph on the slide-out panel that appears.
- Select Application permissions.
- Type “Directory” in the Select permissions search field.
- Expand the Directory heading.
- Check the box next to Directory.Read.All.
- Click Add Permissions. You’ll now be back on the main Application registration screen
- Click Grant admin consent for Tennant.
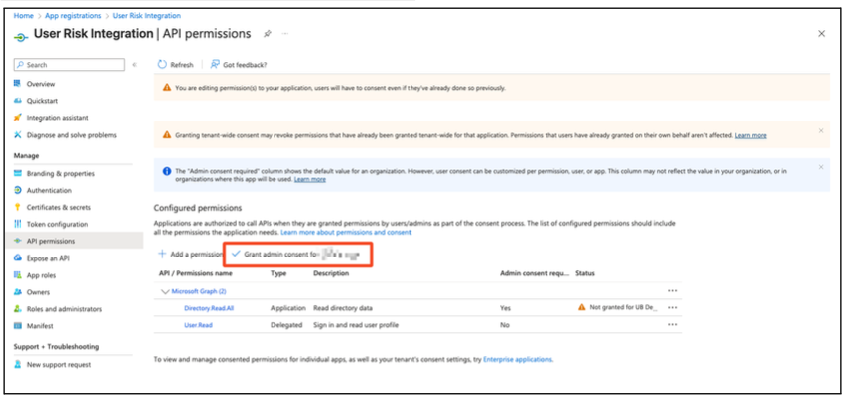
- Check the Status column and confirm that permission is still “Granted”.
To learn more, see Configure app permissions for a web API.
Step 3: Generate an application secret
- From the Application Registration screen, select Certificates & secrets from the left navigation.
- Add a Description and an expiry date on the slide-out panel.
- Click Add.
- After the secret is created, copy its Value using the copy icon. Entra shows this value only once, so store it somewhere safe — you'll enter it into User Risk during the integration.
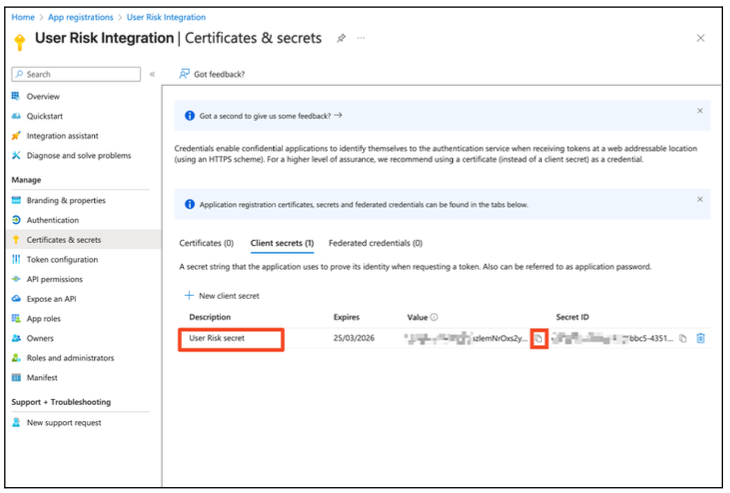
The Client Secret must be entered into User Risk during the integration process.
To learn more, see Add and manage application credentials in Microsoft Entra ID.
Step 4: Gather the Tenant and Application ID
- Navigate to the Application Registration “Overview” screen.
- Copy the Application (client) ID and the Directory (tenant) ID from the Overview page. You'll enter both into User Risk during the integration.
Step 5: Enter the values into User Risk
- Click the settings cog in UpGuard’s top right corner.
- Click Directory Integration under User Risk in the left panel.
- Click Integrate via Entra app registration.
- Enter the Application (client) ID, Directory (tenant) ID, and Client secret value from earlier.